
How to build a Python monorepo with Direnv
This blog posts describes my take on how to create a Python monorepo using direnv and standard Python tools like build, setuptools and wheel.
The project created this way is much more beginner-friendly than using tools like Poetry or Bazel as it doesn’t require any esoteric knowledge on how best to use these tools.
In my previous role I worked on a project using Bazel and I found it to be a very powerful tool, but it was also very hard to use for new developers and applied scientists. The IDE support was also quite poor, which meant that developers weren’t getting the best experience possible.
This approach attempts to solve the following issues:
- It should be easy to use for all developers, regardless of their experience with Python
- It should allow a similar level of environment isolation as Bazel and NPM (remember
node_modulesfolder?) - It should be playing nicely with ANY IDE, not just the ones that have a plugin for Bazel
- It should be easy to build a production-ready Docker image from the monorepo
- It should allow publishing the packages to a private or public PyPI server
Please feel free to comment on this post if you have any suggestions on how to improve this approach.
Prefer reading on GitHub?
As part of this blog post I’ve created a GitHub repository with the example project showing how to create a Python monorepo. The repository also shows how to build a production-quality Docker image using the wheels produced as part of the build. Feel free to reuse this repository as a starting point for your own project. It’s licensed under the MIT license.
Why direnv?
I’ve been using direnv for a while now and I’ve found it to be a very useful tool. It allows you to configure your environment based on the current directory. This is very useful when working with monorepos as you can have different configurations for different projects.
In our case we will use it to automatically create and set the Python virtual environment for the project whenever we enter the project directory in the terminal. We’ll also use this Python virtual environment to provide the Python interpreter for the IDE.
Project structure
The project structure I’ve settled on is as follows:
python-monorepo               # The root of the project (the name of the folder doesn't matter)
|-- .envrc                    # Contains a configuration for direnv
|-- .gitignore                # Ignore the .direnv, Intellij, vs-code and build outputs
|-- requirements.txt          # Dependencies needed for local development
|-- myPackage1
|   |-- pyproject.toml        # Boilerplate for setuptools
|   |-- setup.cfg             # Contains package configuration: dependencies, name, author
|   |-- src
|       |-- __init__.py       # empty file
|       |-- myPackage1        # Note that the name matches the parent folder name
|           |-- __init__.py   # empty file
|           |-- file1.py
|-- myPackage2
    |-- pyproject.toml        # Boilerplate for setuptools
    |-- setup.cfg             # Contains package configuration: dependencies, name, author
    |-- src
        |-- __init__.py       # empty file
        |-- myPackage1        # Note that the name matches the parent folder name
            |-- __init__.py   # empty file
            |-- file1.py
Creating .envrc
The .envrc file is responsible for creating the Python virtual environment and setting it as the default Python interpreter for the project. This virtual environment will protect your global installation of Python from any changes you make to the project. It will also allow you to use different versions of Python for different projects.
In your project create a .envrc file with the following content:
layout python3
This will tell direnv to create a Python virtual environment for the project and use it as the default Python interpreter.
By default, direnv is forbidden from executing the .envrc files, so when you navigate to the root of the project in terminal you’ll be greeted with the following error:
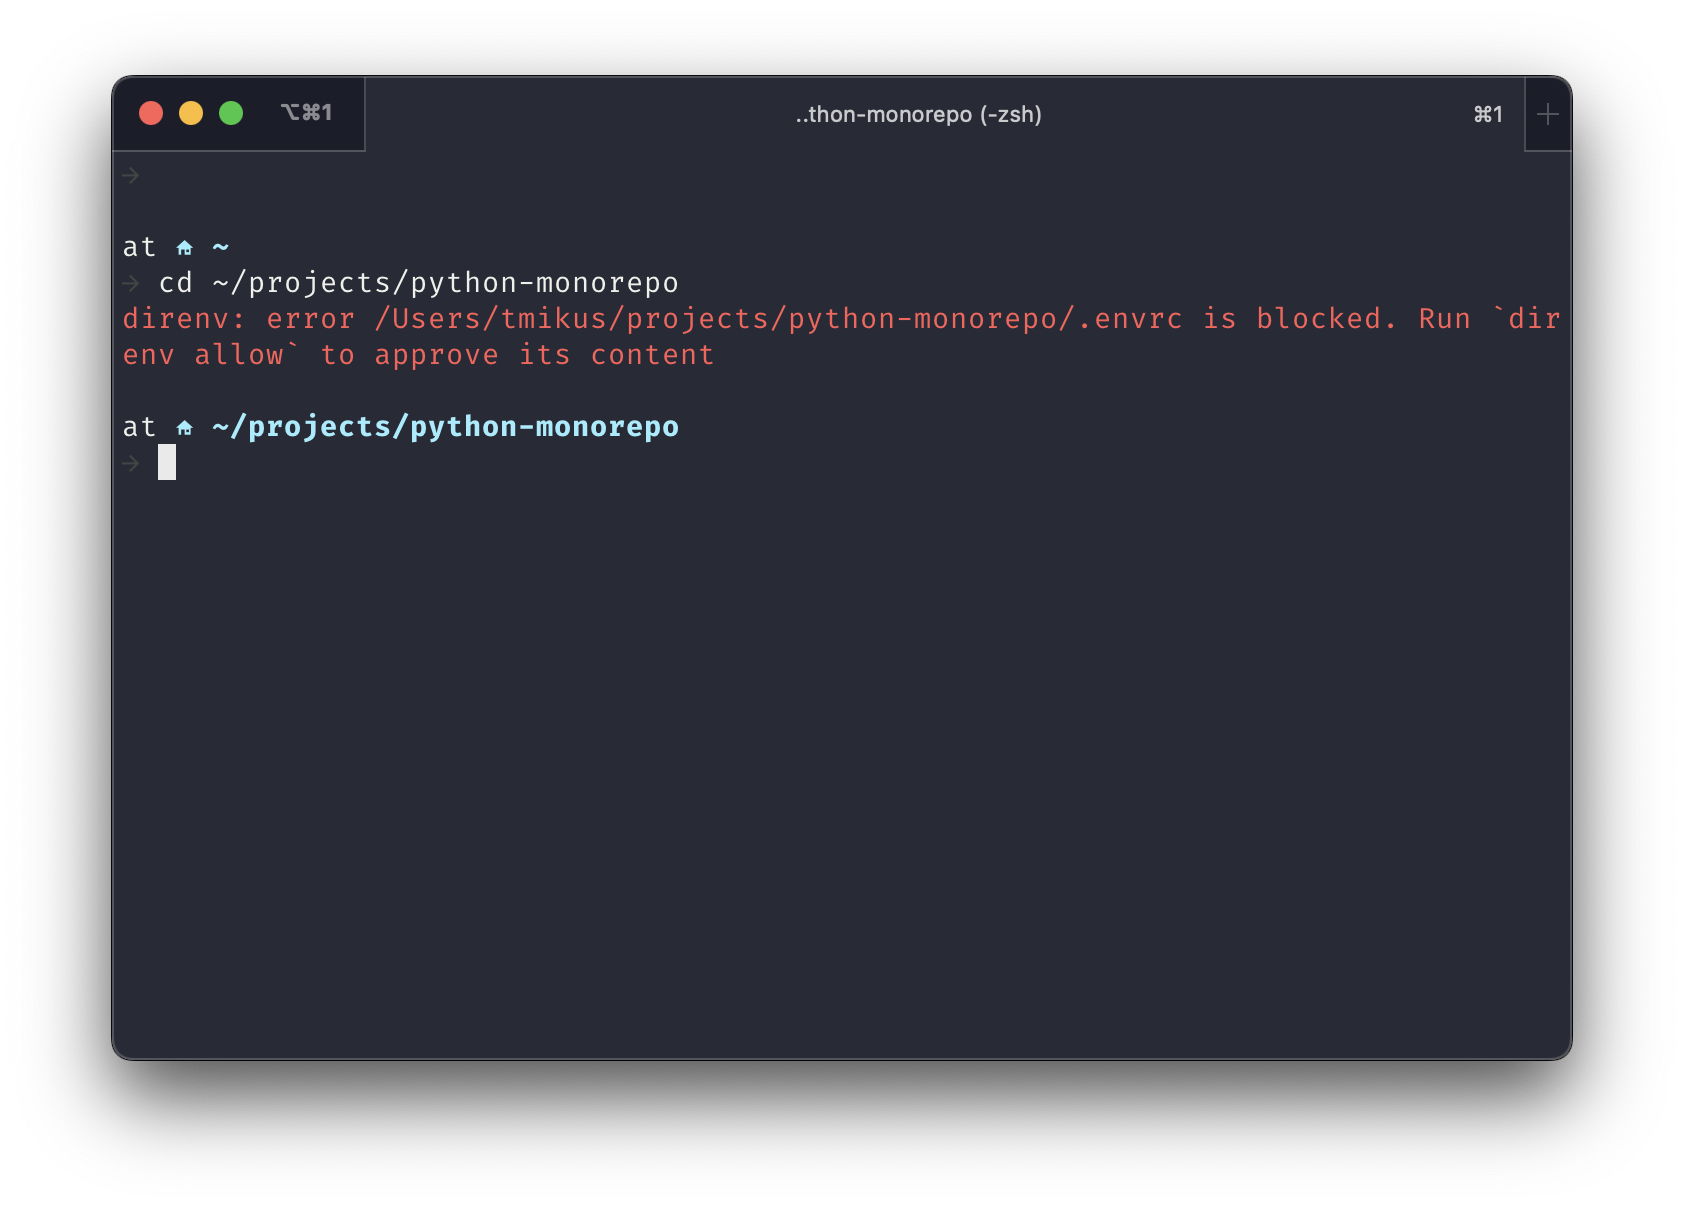
The first time you use the repository on your device you’ll have to allow direnv to use that .envrc file. To do that simply run the following command in the root of your project:
direnv allow .
Once you do this you should be greeted with the following log:
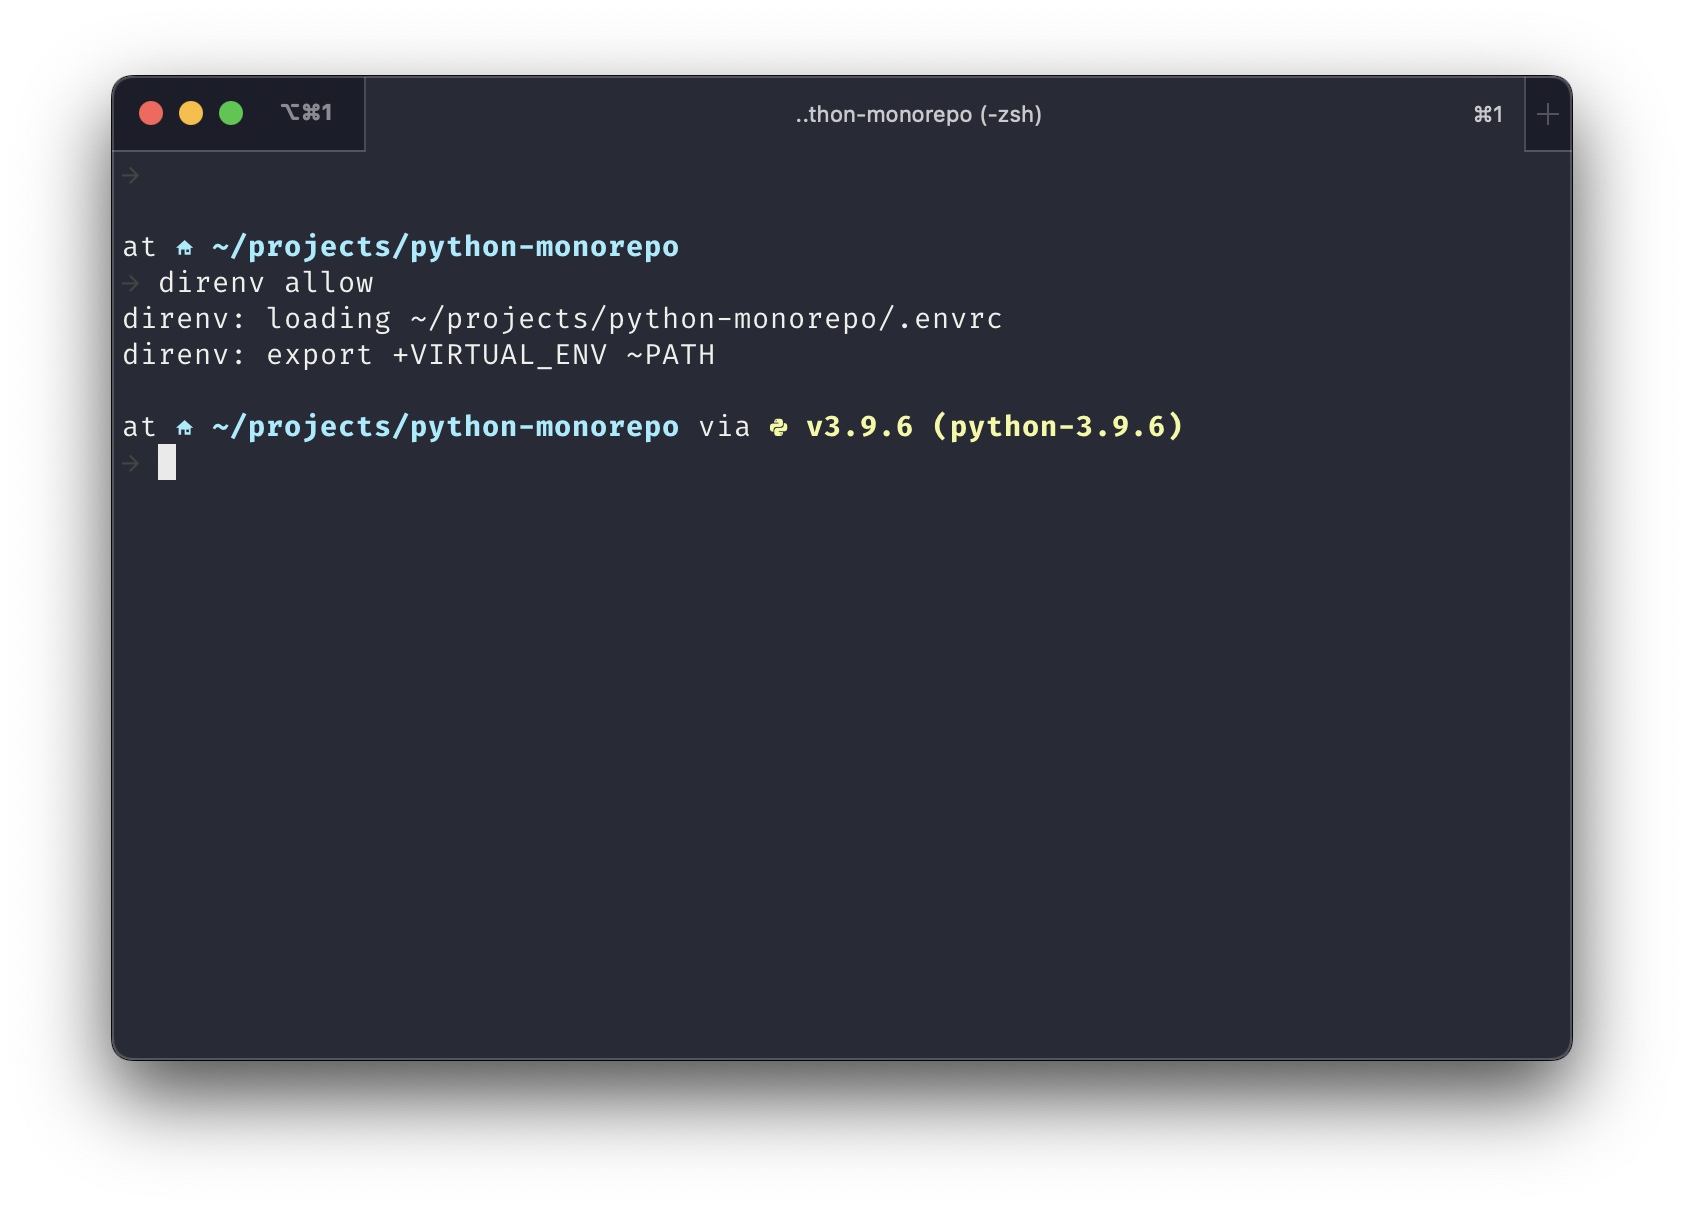
The warning about direnv not being allowed to use the .envrc might reappear if you make any changes to the .envrc file. To fix this simply run the direnv allow . command again.
Creating requirements.txt
This file should list all the dependencies required by your project to run locally, as well as a list of all the packages belonging to the monorepo. The requirements.txt file will only be used for local development and will not be used in production, because production dependencies will be specified in the setup.cfg file for each package.
The packages that belong to the monorepo should be installed as editable dependencies (prefixed with -e). This will allow you to make changes to the packages and see the changes immediately in the project that uses them.
# Monorepo packages
-e api      # Corresponds to the api folder
-e utils    # Corresponds to the utils folder

# Dependencies
returns >= 0.19.0  # An example dependency

# Dev Dependencies
pytest >= 7.2.1    # An example dev dependency

# Build-time dependencies that are needed to build this project
build
setuptools
setuptools-scm
wheel
Creating packages
To create a new package, simply create a new folder in the root of the project with the name of the package and the following directory structure. The structure below is based on the official Python packaging guide and the official comparison between src layout vs flat layout.
myPackage
|-- pyproject.toml        # Boilerplate for setuptools
|-- setup.cfg             # Contains package configuration: dependencies, name, author
|-- src
    |-- __init__.py       # empty file
    |-- myPackage         # Note that the name matches the parent folder name
        |-- __init__.py   # empty file
        |-- file1.py      # Some file that belongs to the package
The pyproject.toml file should contain the following content:
[build-system]
requires = ["setuptools", "setuptools-scm", "wheel"]
build-backend = "setuptools.build_meta"
The setup.cfg file should contain the following content:
[metadata]
name = myPackage    # Change this to whatever you want
version = 1.0.0

[options]
package_dir =
    = src
packages = find:
python_requires = >=3.9
include_package_data = true
zip_safe = true
install_requires =
    # List runtime dependencies in the same format as in the requirements.txt file

[options.extras_require]
# List of optional runtime dependencies

[options.packages.find]
where = src

[options.package_data]
# * = **/*.json, **/*.txt     # Uncomment if your package comes with any JSON or TXT files you'd like to bundle
# You can list your package data files here.
Notice the install_requires section. This is where you specify the runtime dependencies of the package. The dependencies should be listed in the same format as in the requirements.txt file.
Adding cross-package dependencies
To add a dependency between two packages, simply add the name of the package to the install_requires section of the setup.cfg file of the package that depends on the other package.
For example, given the project with the packages utils and api, to add a dependency from api to utils, simply add the following line to the setup.cfg file of the api package:
install_requires =
    # List runtime dependencies in the same format as in the requirements.txt file
    utils
Building the packages
To build a specific package, navigate to the root directory of the package (the directory that contains the setup.cfg file) and run the following command:
python -m build
The build command will create a dist folder in the root of the package and will place the .whl file there.
This command also takes a while to complete as it will create a new isolated virtual environment, and build the package in that isolated environment.
To speed up that build you can run the command without the virtual environment by running the following command:
python -m build --no-isolation
Building a Docker image
As you might have noticed, the build command creates a .whl file. This file can be used to install the package in a Docker image. In a larger monorepo, you might think that you might have to install every package in that was produced by your build. However, this is not the case.
The pip install command can be configured to only install your main package, and to find all required dependencies specified in your setup.cfg file from that package. Simply make sure that you copy all the wheels to your Docker image. Once you install your main wheel with its dependencies, you can remove all wheels to save space.
For example, given the project with the packages utils and api, to build a Docker image for the api package, you can do the following:
FROM python:latest

# Display python version
RUN python --version

# Copy wheel files to /app
WORKDIR /app
COPY build/*.whl .

# Install packages. This will ensure that all dependencies of wheels are installed
RUN pip install --find-links /app/*.whl api-*.whl

# Remove all wheels to save space
RUN rm -rf *.whl

# Change the user to a non-root user
USER 1234

# Run the API
CMD ["python", "-m", "api"]
Notice the --find-links flag. This flag tells pip to look for dependencies in specified paths. In this case, we’re telling pip to look for dependencies to look for dependencies in all the .whl files in the /app directory.
IntelliJ IDE configuration
To configure the IDE to use the Python virtual environment created by direnv you’ll have to do the following:
- Open the project in the IDE
- Go to
File -> Project Structure... - Expand the
SDKdropdown, and clickAdd new SDK... -> Python SDK - In
Virtualenv environmentselect radio buttonExisting environment, and click...to the right of the text field - Select the Python interpreter from the virtual environment created by
direnv(it should be in the.direnvfolder in the root of the project). In my case it’s in/Users/tmikus/projects/python-monorepo/.direnv/python-3.9.6/bin/python - Click
OK - Make sure that this new Python SDK is selected in the
Project SDKdropdown - Click
OK
Visual Studio Code configuration
From my experience, there’s no need for any custom configuration in VS Code. This project should simply work out of the box.